
If you haven’t yet registered an NTN or CNIC with FBR, IRIS lets you self-register before logging in for the first time and filing a return. This is the registration wizard — separate from actually logging in and filing your first return — and includes the extended profile (property, business, bank account details) you’ll fill out upon login.
For the full return-filing wizard walk-through after initial registration, see our step-by-step guide to filing your income tax return online.
Step 1: Self-Registered CNIC Login
On the IRIS login screen, click “Registration for Unregistered Person.” You’ll be asked to provide:
- Your CNIC (13-digit, no dashes)
- A Prefix (Mr./Mrs./Ms./etc.), First Name, Middle Name, and Last Name
- Your Cell No. and confirmation of the same number is “Registered on your CNIC” against your mobile SIM
- An Email and confirmation of the same address
After clicking Submit, IRIS will send an SMS Code and Email Code for verification; enter both codes and click Submit again (use the Resend option if you don’t receive either code within roughly 5 minutes).
Step 2: Completing Your Registration Profile
After successful verification, IRIS will create your login and save a “181 (Form of Registration filed voluntarily)” in your Drafts under Registration. Open it and click Edit to begin filling out your Personal information and Accounting Period, followed by the four sections below.
Step 3: Add Your Property
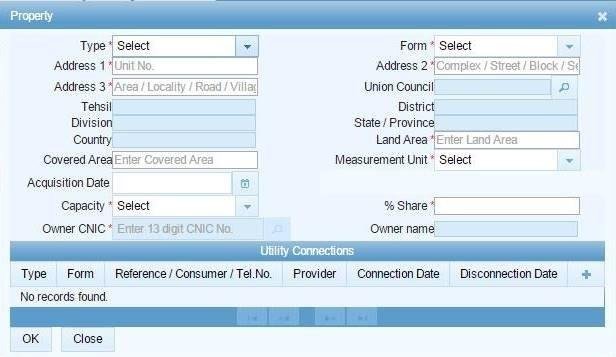
Under the Property tab, click “+ Property” and enter the following:
- Type and Form of the property, Address 1/2/3, Union Council, Tehsil, District, and Province (searchable by Union Council)
- Covered Area, Land Area, and Measurement Unit
- Acquisition Date, your Capacity (owner/co-owner/etc.), and % Share
- Owner CNIC (if applicable)
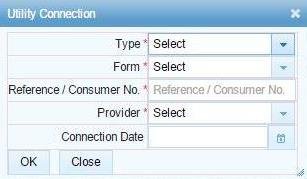
Click OK to save the property and use the “+” under Utility Connections to enter any Electricity, Gas, or other connection related to the property, including the Type/Form of Connection, Reference/Consumer No., Provider, and Connection Date:
Step 4: Add Your Business
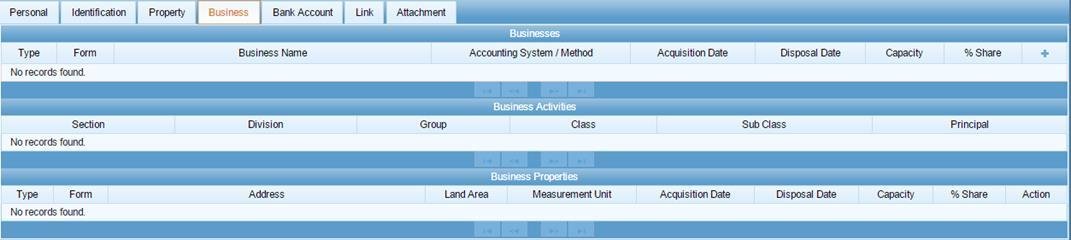
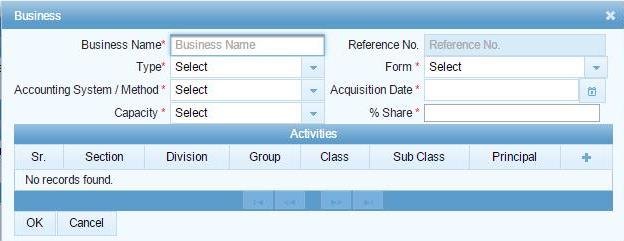
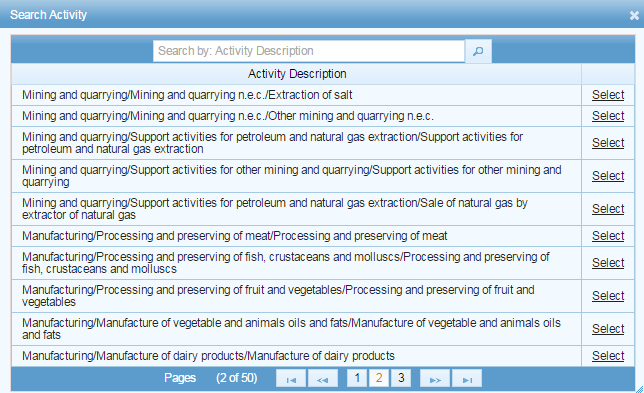
Under the Business tab, click “+ Business” and enter the Business Name, Type/Form, Accounting System/Method, Acquisition Date, and Capacity/% Share. Under Business Activities, click “+ Business Activity” and use the Search function to select your Principal Activity; the activities are organized under Sections -> Divisions -> Groups -> Classes -> Sub-Class, so it’s best to type in a keyword and click “Select” on whichever real-world business activity most closely matches your own. Add a Start Date and click OK.
If the Business is located in a Property you’ve already entered, use the “Link Property” option under Business to link the two records rather than re-entering the Property information:
Step 5: Add Your Bank Account
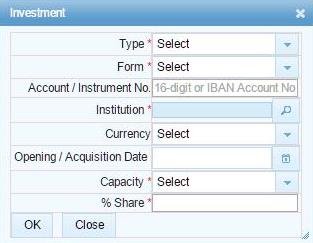
Under the Bank Account tab, click “+ Bank Account” and enter the Account/Instrument Type, Account No./IBAN, Institution (searchable), Currency, Opening/Acquisition Date, your Capacity/% Share (if any):
Step 6: Link Related Persons (If Applicable)
Under Links, click “+ Link Person” if you need to register a relationship to another person or entity (spouse, business partner, dependent, etc.); search for the person/entity, set your Capacity/% Share (if any), and add a Start Date.
Step 7: Submitting Your Registration
After completing all applicable sections, click Save to save your progress or Submit to mark the registration as complete; you can also Print a copy of the submitted registration for your records.
Common Errors and Fixes for IRIS Registration
- Using a mobile number that isn’t registered on your own CNIC. IRIS registration requires a mobile number “Registered on your CNIC;” any other number will simply fail at the verification step.
- Guessing at the Business Activities and selecting a category that doesn’t match the real-world activity. The activity list is extensive and hierarchical, so it’s best to search for keywords and select the most relevant/general category available.
- Failing to link a Business to a Property, resulting in having to enter the same address twice. Wherever possible, use the “Link Property” function to tie a Business to an existing Property entry rather than entering the same address information separately for each.
- Forgetting to enter a % Share for any jointly-owned Property/Business/Bank Account. This information is required to correctly categorize individual income during return-filing.
FAQ
Do I need to separately register for income tax and sales tax?
Not on IRIS — your primary CNIC-based registration covers income tax, while sales tax registration is a separate process you’ll need to complete (if applicable).
What if I don’t have a property, business, or bank account yet?
You can always complete the registration process with just your Personal information and return to the other sections later when you have the relevant information on hand.
Can I update my registration if I discover an error?
Yes; simply log back in to IRIS, return to Registration, and edit the relevant section; your updates will carry over to any future returns, as IRIS uses the same registration information for all filings.
Do you handle NTN registration instead?
If you’d prefer us to handle your NTN registration on your behalf, we’re happy to take care of the entire FBR IRIS registration process for you. You can also complete the NTN registration on your own through the FBR IRIS portal.
Registering for Sales Tax Too?
This guide covers the basic IRIS registration required for any taxpayer. If you’re registering specifically for sales tax and need information on the documents required or how an STRN differs from your NTN, consult our guides on documents for sales tax registration and differences between STRN and NTN instead.